.avif)
Hi there, everyone! I'm thrilled to share insights into a remarkable library I've been working with recently—LangGraph. This powerful tool revolutionizes how we manage state in AI workflows, offering an intuitive and flexible approach. Let’s dive into what LangGraph is, how it works, and why it’s a game-changer for developers like me.
What is LangGraph?
LangGraph is a robust library designed to facilitate state management in complex AI workflows. It allows developers to define, manage, and transition between various states seamlessly, ensuring that AI agents can handle multiple tasks efficiently. At its core, LangGraph uses state graphs, which are a series of interconnected nodes representing different states and transitions based on specific conditions.
Key Features of LangGraph
- State Management: LangGraph excels at managing an application's state. It allows for defining various states and transitions, making it easier to control the flow of information and actions within an AI workflow.
- Dynamic Tools Integration: Integrating dynamic tools is straightforward with LangGraph. Tools can be defined and invoked based on the application's state, providing a modular and extensible approach to functionality.
- Conditional Transitions: The library supports conditional transitions, enabling the workflow to change direction based on the outcome of specific actions or evaluations.
- Persistent State: LangGraph ensures that the state is persistent, allowing the workflow to maintain context and continuity over time.
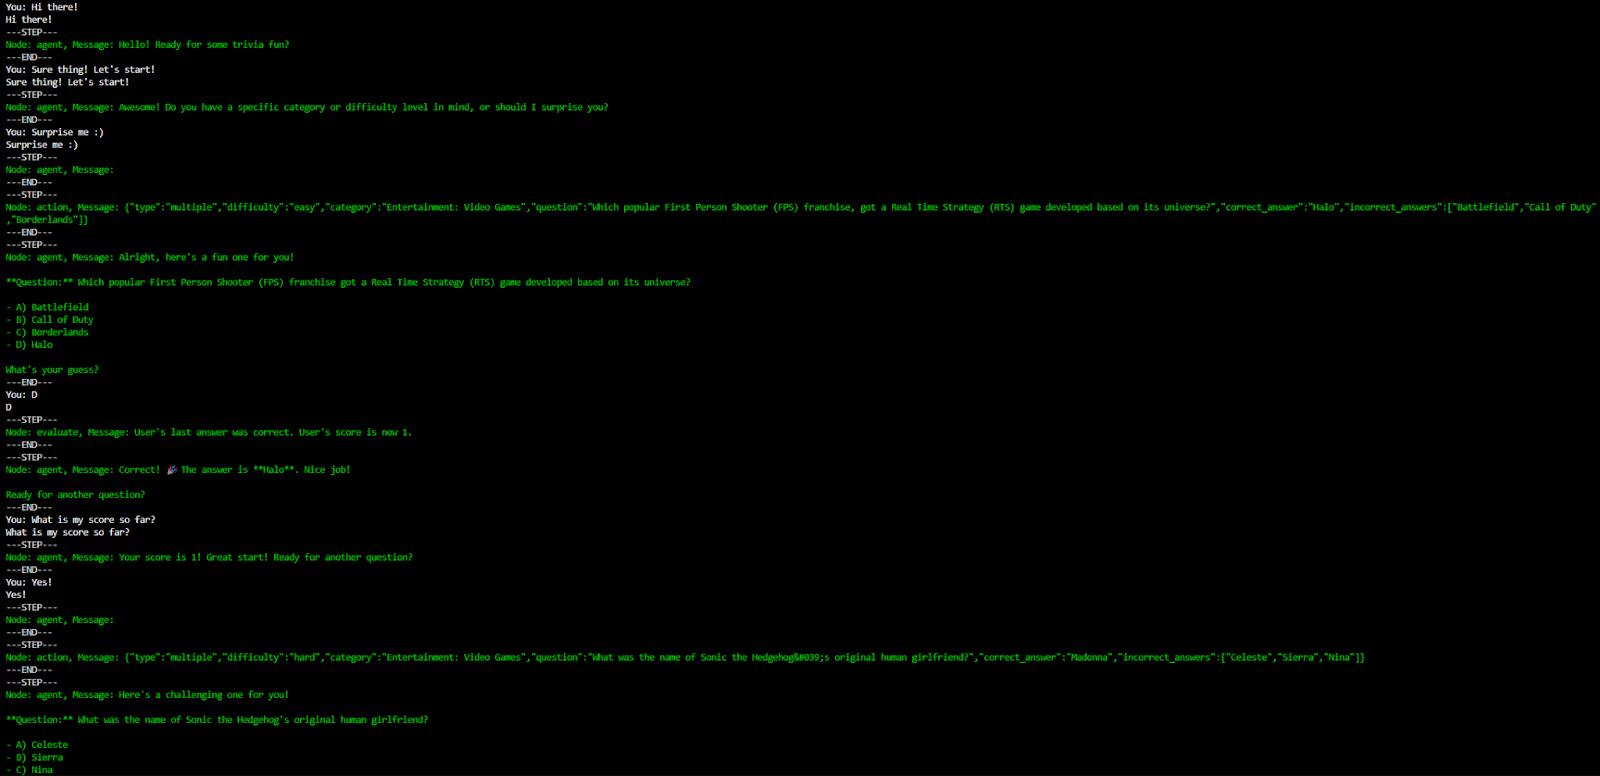
Building a Trivia Bot with LangGraph
To illustrate the power of LangGraph, let’s walk through a project I recently completed—a fun and engaging Trivia Bot. This bot uses LangGraph to manage its state and transitions between asking questions, receiving answers, and evaluating responses.
For production-grade LLM testing in this style, see Azumo's model evaluation services.
Prerequisites
- @langchain/langgraph and @langchain/openai: These are part of the LangChain suite, crucial for integrating LangChain functionalities into your application. They allow you to utilize advanced AI and graph-based state management features.
- chalk: This library is used for styling and coloring console output, making debugging and logs easier to read and understand.
- dotenv: Manages environment variables, which is especially useful for keeping your API keys and other sensitive information secure and out of your codebase.
- node-fetch: Provides a way to make HTTP calls, which is essential for interacting with external services and APIs.
- TypeScript and ts-node: TypeScript extends JavaScript by adding types, and ts-node allows you to execute TypeScript directly in Node.js without pre-compilation. This is particularly useful for development environments.
- @types/node: This includes type definitions for Node.js, making your development experience smoother by providing autocomplete and type-checking for built-in Node.js modules.
- nodemon: A utility that monitors for any changes in your source and automatically restarts your server, perfect for speeding up the development process.
Setting Up the Environment
First, we set up the environment and import necessary packages, including LangGraph, LangChain, and other utilities:
import "dotenv/config";
import fetch from "node-fetch";
import readline from "readline";
import { DynamicStructuredTool } from "@langchain/core/tools";
import { z } from "zod";
import { ToolExecutor } from "@langchain/langgraph/prebuilt";
import {
  BaseMessage,
  HumanMessage,
  SystemMessage,
  FunctionMessage,
} from "@langchain/core/messages";
import { ChatOpenAI } from "@langchain/openai";
import {
  START,
  END,
  StateGraph,
  StateGraphArgs,
  MemorySaver,
} from "@langchain/langgraph";
import { convertToOpenAIFunction } from "@langchain/core/utils/function_calling";
import chalk from "chalk";
Defining the Trivia Tool
We define a trivia tool that fetches questions from the Open Trivia Database:
// Define the Trivia Tool
const TriviaTool = z.object({
  category: z.string().optional(),
  difficulty: z.string().optional(),
});

const triviaTool = new DynamicStructuredTool({
  name: "trivia",
  description: "Fetches trivia questions from the Open Trivia Database.",
  schema: TriviaTool,
  func: async ({
    category,
    difficulty,
  }: {
    category?: string;
    difficulty?: string;
  }) => {
    const baseEndpoint = "https://opentdb.com/api.php?amount=1";
    let endpoint = baseEndpoint;
    if (category) {
      endpoint += `&category=${category}`;
    }
    if (difficulty) {
      endpoint += `&difficulty=${difficulty}`;
    }
    const response = await fetch(endpoint);
    const data: any = await response.json();
    return JSON.stringify(data.results[0]);
  },
});
Understanding DynamicStructuredTool
The DynamicStructuredTool class in LangGraph is designed to handle complex input schemas using Zod, a schema declaration and validation library. This allows the tool to define precise and structured input types, which the language model can then use to understand what parameters are needed. In our example, the TriviaTool schema includes optional fields for category and difficulty, enabling the tool to fetch trivia questions based on these criteria.
When the tool is invoked, it constructs an API request to the Open Trivia Database, dynamically appending any provided parameters to the request URL. The response is then processed and returned as a string, ready for use by the language model.
Setting Up the Model
We configure the OpenAI model and bind it to our tools:
const model = new ChatOpenAI({
  temperature: 0,
  streaming: true,
  apiKey: process.env.OPENAI_API_KEY,
  model: "gpt-4o",
});
const tools = [triviaTool];
const toolExecutor = new ToolExecutor({ tools });
const toolsAsOpenAIFunctions = tools.map((tool) =>
  convertToOpenAIFunction(tool)
);
const newModel = model.bind({ functions: toolsAsOpenAIFunctions });
Defining Agent State
We define the agent's state, including messages, score, and the last step taken:
enum Step {
  Action = "action",
  Evaluation = "evaluation",
}

interface AgentState {
  messages: BaseMessage[];
  score: number;
  lastStep: Step | null;
}

const agentState: StateGraphArgs<AgentState>["channels"] = {
  messages: {
    reducer: (x: BaseMessage[], y: BaseMessage[]) => x.concat(y),
    default: () => [
      new SystemMessage("You are a fun and engaging Trivia Bot!"),
    ],
  },
  score: {
    reducer: (x: number, y: number) => x + y,
    default: () => 0,
  },
  lastStep: {
    reducer: (x: Step | null, y: Step | null) => (y ? y : x),
    default: () => null,
  },
};
Configuring the OpenAI Model
We start by setting up our model using the ChatOpenAI class from LangGraph. This class allows us to integrate various tools into our model, which can then be called during conversations based on the logic defined in our agent. Here’s a breakdown of how this is achieved:
- Initialization: We initialize the ChatOpenAI model with specific parameters such as temperature for randomness control, streaming for handling real-time data, and authentication details.
- Tool Integration: Tools are encapsulated functionalities that you can invoke via the model. We use DynamicStructuredTool instances for this purpose, as they allow for structured and schema-validated inputs. Each tool is then converted into a function that the OpenAI model can understand and execute using convertToOpenAIFunction.
- Binding Tools: The bind method attaches these tools to the model, enabling the model to call these tools dynamically based on the conversation context. This setup allows for a modular and extensible approach to adding functionalities to your agent.
Defining Agent State
The state of the agent is crucial for maintaining continuity and context in interactions. LangGraph uses a state graph where each node represents a state, and edges define transitions based on conditions:
- State Variables: We define several state variables such as messages, score, and lastStep. These are managed through reducers that handle updates to these variables based on actions taken during the agent's operation.
- Reducers: For instance, the messages reducer concatenates new messages to the existing array, ensuring that all interaction history is preserved. Similarly, the score reducer updates the score based on the evaluations performed by the agent.
- Default Values: Initial values are crucial as they define the starting state of the agent. For example, the messages array might start with a welcoming system message to initiate interaction.
Creating Workflow Nodes
We create nodes to handle different actions within the workflow:
Creating Workflow Nodes for an AI Agent
In LangGraph, creating workflow nodes is a critical step to define how the agent processes and reacts to interactions. These nodes are essentially functions that manage different stages of conversation or task execution. Here, we discuss the functions designed to handle model invocation, tool usage, and responses based on evaluation criteria.
Node for Invoking the Model
The callModel function is a pivotal node that directly interacts with the AI model. Here's a deeper dive into its operation:
- Message Handling: It retrieves the current state's messages which encapsulate the ongoing dialogue.
- Model Invocation: These messages are passed to the AI model (newModel.invoke(messages)), which processes them and generates a response.
- Function Call Detection: The function checks if the model's response suggests a subsequent action, such as calling a tool. If so, it adjusts the workflow's direction to handle this action.
Node for Calling Tools
The callTool function exemplifies how the system uses external tools to perform tasks or retrieve information based on the AI's decision:
- Action Retrieval: It extracts the necessary action from the state, which includes identifying which tool to use and the inputs for that tool.
- Tool Execution: Utilizing the toolExecutor, it calls the specified tool with the given inputs and captures the tool's output.
- Message Creation: The output is then wrapped in a FunctionMessage, which standardizes the response for the workflow and updates the state to reflect that an action has been executed.
Node for Evaluating Answers
The evaluateAnswer function is designed to assess answers based on predefined criteria:
- Response Generation: It prompts the model to evaluate the latest user answer by appending a specific instruction to the existing messages and invoking the model to get an evaluation.
- Score Update: Depending on whether the evaluation indicates a correct or incorrect answer, it updates the score accordingly.
- State Update: Updates the workflow state with the evaluation result and the new score, providing feedback on the user's performance.
Conditional Logic for Workflow Transition
The shouldEvaluate and shouldCallTool functions control the flow of the conversation by determining the next state based on current conditions:
- shouldEvaluate: Decides whether to move to an evaluation phase based on the last action taken. If the last action involved executing a tool, it might prompt an evaluation; otherwise, it continues with the model interaction.
- shouldCallTool: Checks the latest message for a function call. If present, it directs the workflow to handle this tool call; if not, it concludes the interaction phase.
Defining the Graph
We define the state graph, specifying the nodes and conditional edges:
const workflow = new StateGraph({ channels: agentState });
workflow.addNode("agent", callModel);
workflow.addNode("action", callTool);
workflow.addNode("evaluate", evaluateAnswer);
workflow.addConditionalEdges({
  source: START,
  path: shouldEvaluate,
  pathMap: {
    agent: "agent",
    evaluate: "evaluate",
  },
});
workflow.addConditionalEdges({
  source: "agent",
  path: shouldCallTool,
  pathMap: {
    action: "action",
    end: END,
  },
});
workflow.addEdge("action", "agent");
workflow.addEdge("evaluate", "agent");

const checkpointer = new MemorySaver();
const config = { configurable: { thread_id: "test-thread" } };
const app = workflow.compile({ checkpointer });
Defining the State Graph in LangGraph
In LangGraph, defining the state graph is a critical process that structures the AI's decision-making and action-taking capabilities based on user interactions and internal logic. This section will break down the key components of setting up the state graph and explain how nodes and conditional edges are utilized to create a dynamic and responsive AI agent.
Overview of the State Graph
The state graph in LangGraph is a powerful framework that models the states through which an AI agent transitions during its interaction with a user. This graph is composed of nodes representing different states and edges that define transitions based on certain conditions:
- Initialization: We begin by creating a new StateGraph instance, passing the agentState which includes all channels like messages, scores, and steps that we defined earlier.
- Adding Nodes: Nodes are added to the graph, each corresponding to a specific function:
- agent: Tied to the callModel function, handles the model's response, and determines the next step.
- action: Linked to the callTool function, executes a tool based on the model's instructions.
- evaluate: Associated with the evaluateAnswer function, evaluates the user’s response and updates the score.
Configuring Conditional Edges
Conditional edges are crucial for determining the flow of actions in the AI agent:
- From Start: Determines whether to initiate with the agent's general interaction or move directly to evaluation based on the conditions set in shouldEvaluate.
- From Agent: Based on shouldCallTool, it decides whether to perform an action with a tool or end the interaction. This allows the agent to dynamically choose between continuing the conversation, using a tool, or concluding the interaction.
Edge Management
Edges between nodes facilitate the transitions:
- Direct edges like workflow.addEdge("action", "agent") and workflow.addEdge("evaluate", "agent") loop back to the agent node, enabling a cycle that allows the agent to continuously process and respond to inputs until a termination condition is met.
Checkpointing and Compilation
- Checkpointer: Utilizes MemorySaver for state persistence, ensuring that the agent can remember past interactions and maintain context over the session.
- Compilation: The entire configuration is compiled with the specified settings in config, creating a runnable application (app) that can be executed to interact with users in a live environment.
Interactive Console Setup
Finally, we set up an interactive console to interact with the Trivia Bot:
const rl = readline.createInterface({
  input: process.stdin,
  output: process.stdout,
  prompt: "You: ",
});

const initialState: AgentState = {
  messages: [],
  score: 0,
  lastStep: null,
};

const processInput = async (input: string, state: AgentState) => {
  state.messages.push(new HumanMessage(input));
  for await (const value of await app.stream(state, config)) {
    const [nodeName, output]: any = Object.entries(value)[0];
    if (nodeName !== END) {
      console.log(chalk.white("---STEP---"));
      console.log(
        chalk.green(
          `Node: ${nodeName}, Message: ${
            output.messages[output.messages.length - 1].content
          }`
        )
      );
      console.log(chalk.white("---END---"));
    }
  }
  rl.prompt();
};

rl.prompt();
rl.on("line", async (line) => {
  await processInput(line.trim(), initialState);
}).on("close", () => {
  console.log(chalk.blue("Goodbye!"));
  process.exit(0);
});
Setting Up an Interactive Console for the Trivia Bot
In this final section of our guide, we will establish an interactive console to facilitate user interaction with the Trivia Bot. This setup uses Node.js and the readline module, providing a simple yet effective user interface for real-time interactions. Here’s a step-by-step look at how the console is structured and operates:
Initialize Readline Interface
We begin by creating a readline interface, leveraging Node.js's readline module. This interface connects to process.stdin for input and process.stdout for output, allowing users to type their queries and see the bot's responses directly in the command line.
Define Initial State
Before the interaction starts, we initialize the bot's state. This includes setting up an empty array for messages, a score of zero, and a null value for the last step. This initial state is essential as it tracks the conversation flow and context, helping the bot respond appropriately.
Processing Input
The processInput function is central to handling user inputs:
- Message Handling: Each new input from the user is wrapped in a HumanMessage and pushed into the state. This encapsulation helps in maintaining a structured dialogue history.
- Streaming State Changes: The function streams the state through the app, processing each piece of input and updating the state accordingly. It uses asynchronous processing to handle the flow of data through various nodes in the state graph.
- Logging: For better visibility and debugging, outputs are logged with color coding using chalk. This helps differentiate between steps and outputs in the console, enhancing the user's understanding of the bot's processing steps.
Command Line Interaction
The console prompts users with "You: ", waiting for their input. Upon receiving input, the processInput function is triggered, which processes the input and updates the console:
- Input Handling: When a line is entered, the function processes the trimmed input against the current state.
- Closure Handling: If the console is closed (e.g., via CTRL+C), a goodbye message is displayed, and the program exits, cleanly ending the session.
Running the application
To run the app, just type “npm run dev” to run in development mode or “npm run start” to build and run the app. You can then start playing the trivia game with our own custom agent via the console!
Conclusion
LangGraph offers a powerful and flexible approach to managing state in AI workflows. Its ability to define and transition between states, integrate dynamic tools, and maintain a persistent state makes it an invaluable tool for developers. I hope this post gives you a glimpse into the potential of LangGraph and inspires you to explore its capabilities further in your projects.
By the way, you can find the entire code in this Gist.
Happy coding!

Senior Software Engineer | Fullstack Dev | AI & LLM Enthusiast | Specialist in React, LangChain & OpenAI Integration
Santiago Calvo, Senior Software Engineer at Azumo, specializes in React, LangChain, and OpenAI integration to build AI-powered, scalable applications with both frontend and backend expertise.

.avif)
.avif)